Wir haben bereits über die Arbeit mit Cavaletti geschrieben, über seine Vorteile und wie Sie dies in Ihren Fahralltag einführen können. Außerdem haben Sie gelernt, wie man ein solches Training richtig durchführt – zum Wohle von Pferd und Reiter.
Wir möchten diesen Artikel nur der Arbeit an Bögen mit Cavaletti widmen. Im Folgenden präsentieren wir Ihnen die Vorteile dieser Art von Übung und Beispiele für Einstellungen, die an die jeweilige Gangart angepasst sind. Wir laden Sie zum Lesen ein! :)
Vorteile von Cavaletti bei der Arbeit an Bögen
Was gewinnen wir, wenn wir mit Cavaletti trainieren - mit Bögen arbeiten? Zunächst werden wir unser Training diversifizieren, was dazu führt, dass das Pferd die notwendige und gewünschte Konzentration und volle Fokussierung auf die ausgeführten Elemente erhält. Gleiches wird auch für den Reiter gelten – besonders für denjenigen, der noch seine ersten Gehversuche in der Reitkunst macht und dem es noch an Perfektion fehlt. Trainer, die keine Eintönigkeit zulassen und ständig neue Anforderungen an ihre Schüler stellen, wissen, dass es das Lernen beschleunigt und Fortschritte schneller erscheinen lässt.
Die Arbeit an Cavaletti auf Bögen hilft uns, einseitiges Versteifen zu beseitigen und die Flexibilität zu verbessern, unser Pferd zu positionieren, wenn wir es auf beide Seiten biegen. Dressursportler, die auf den Bögen trainieren, werden unter anderem glattere Kurven gewinnen, die Qualität der gezeichneten Figuren im Viereck erheblich verbessern (Volte, Serpentine, Kurven in Ecken oder auf der Mittellinie usw.). Für Springer wird es einfacher sein, den Parkour zu bewältigen, weil das Pferd „biegsamer“ wird, was bedeutet, dass es sich schneller dreht. Dadurch kann man den Anlauf verkürzen, was besonders bei Speed-Wettkämpfen wichtig ist.
Cavaletti verbessern auch die Gangqualität und den Rhythmus, weil die Pferde ihre Beine durch das Tragen über die Stangen und das Absetzen in regelmäßigen Abständen stärker einbeziehen müssen.
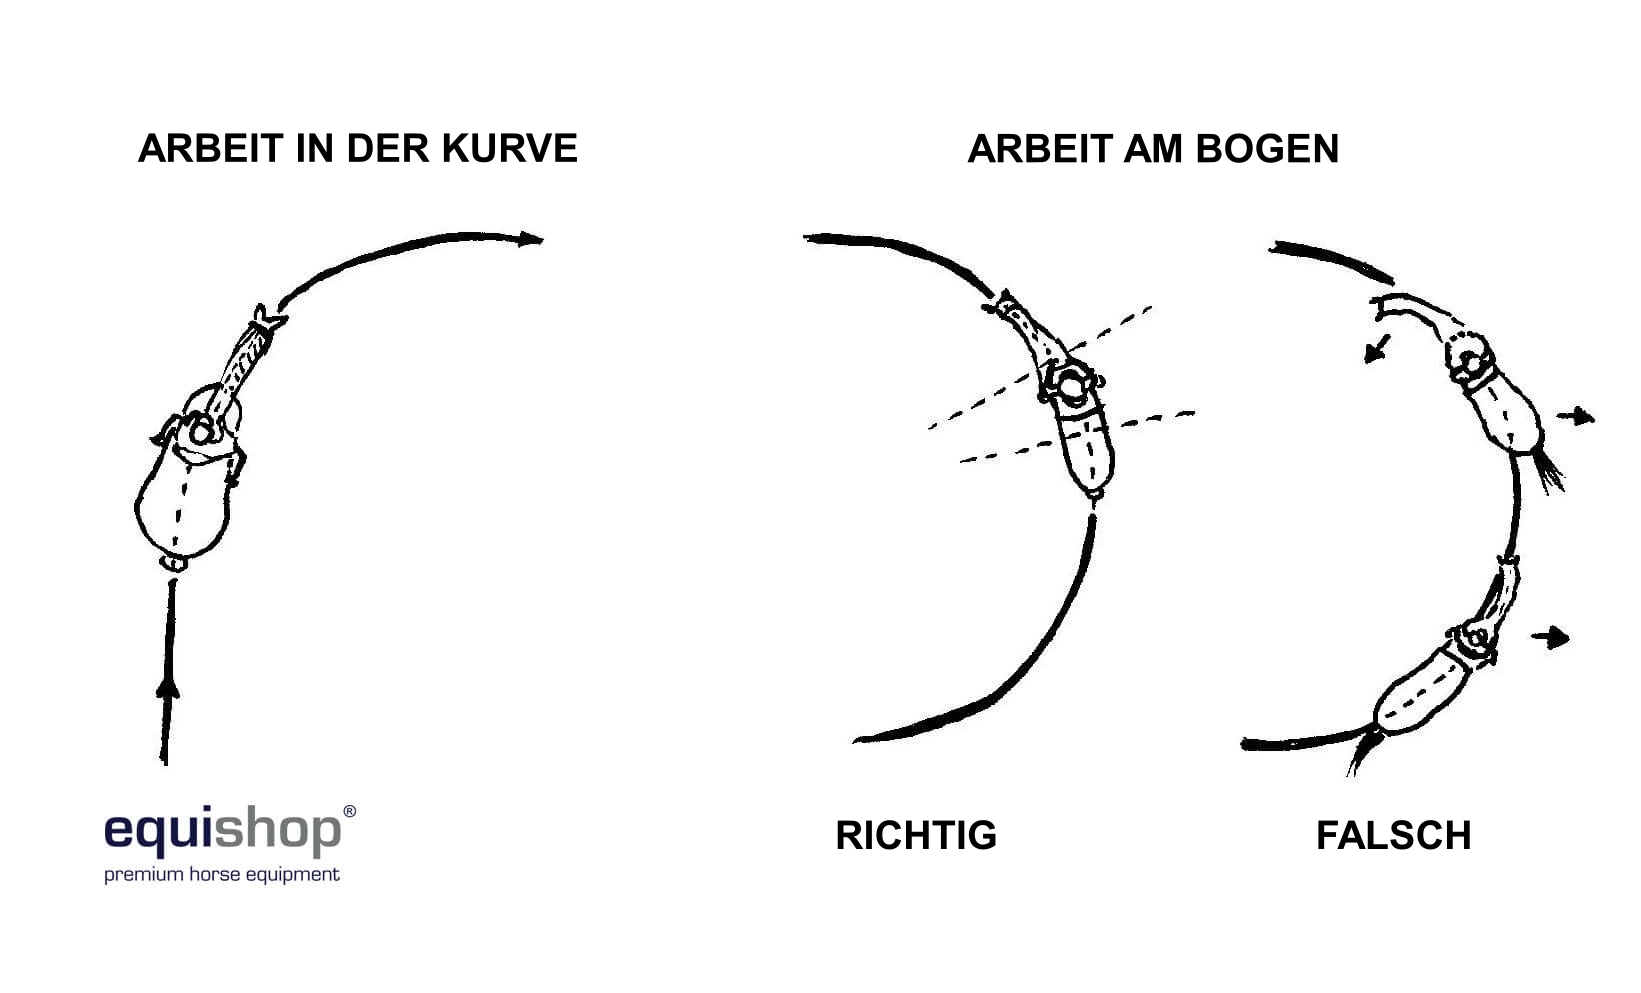
Die Arbeit an geraden Linien und Bögen dient auch der Aufrichtung des Pferdes, d.h. es führt dazu, dass die Hinterhufe immer den Spuren der Vorderhufe folgen. Wenn wir es mit einer Situation zu tun haben, in der das Pferd seine Hinterbeine nicht zum Schwerpunkt unter dem Rumpf, sondern zur Seite hebt, können wir sicher sein, dass unser Pferd leider nicht gerade ist. Wichtig ist, dass Übungen an den Bögen helfen, dies zu korrigieren.
Wir sollten auch daran denken, dass das Pferd neben dem Aufrichten immer nach innen auf dem Bogen aufgestellt werden muss. Das Bild, in dem der Hals des Pferdes außerhalb des Bogens gebogen wird, ist unakzeptabel, wodurch sein Kopf auch außerhalb der Linie ist. Gleiches gilt für die Kruppe und die Hinterbeine des Pferdes – wir können uns nicht nur auf die korrekte Biegung des Pferdehalses konzentrieren. Wenn wir die Waden richtig einsetzen, sollten wir das ganze Pferd im Rumpf biegen, was verhindert, dass die Kruppe aus dem Bogen fällt und das Pferd "gerade" geht.
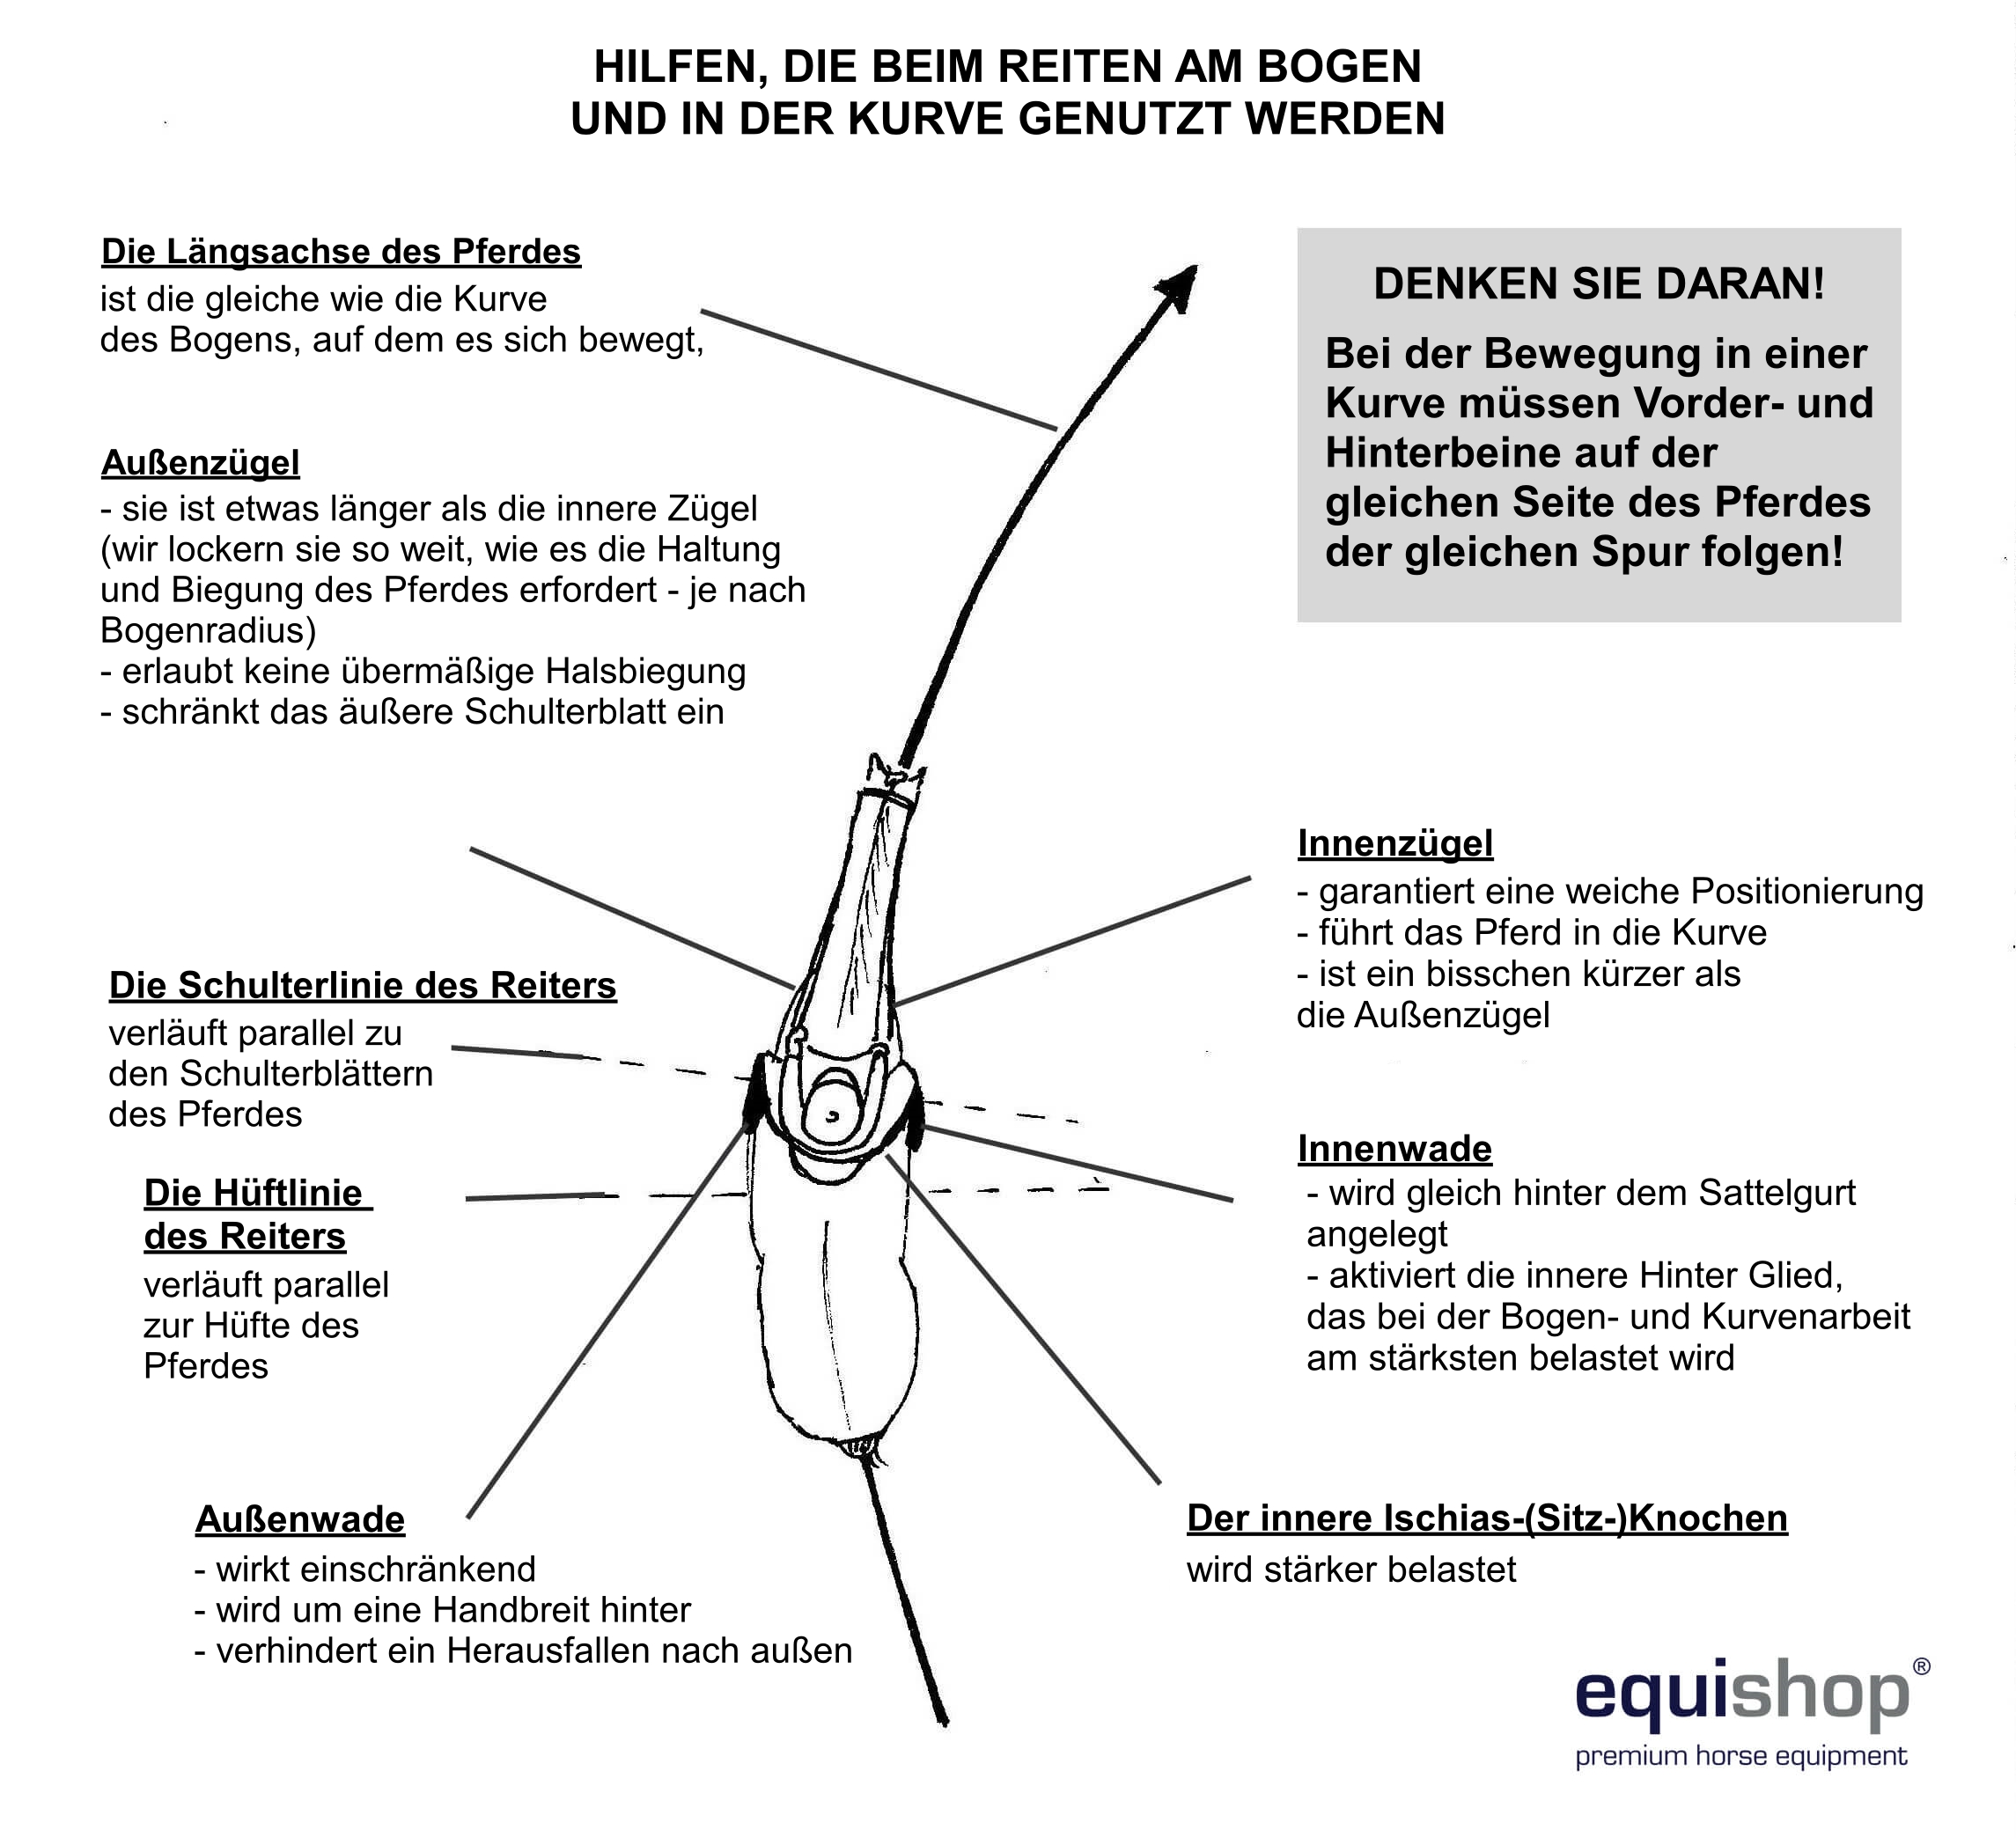
Wie verwendet man Hilfsmittel an einem Bogen oder in einer Kurve?
Wir haben die „richtige Verwendung der Waden“ erwähnt – aber was bedeutet das genau? Nachfolgend beschreiben wir, wie Sie Hilfsmittel beim Reiten an einem Bogen oder in einer Kurve richtig einsetzen.
Das Pferd sollte daher eine Halbkreislinie bilden – vom Schweif bis zum Genick. Die Positionierung seines Körpers sollte daher die Spur widerspiegeln, auf der er sich bewegt. Die gleiche Regel gilt beim Abbiegen oder Wenden.
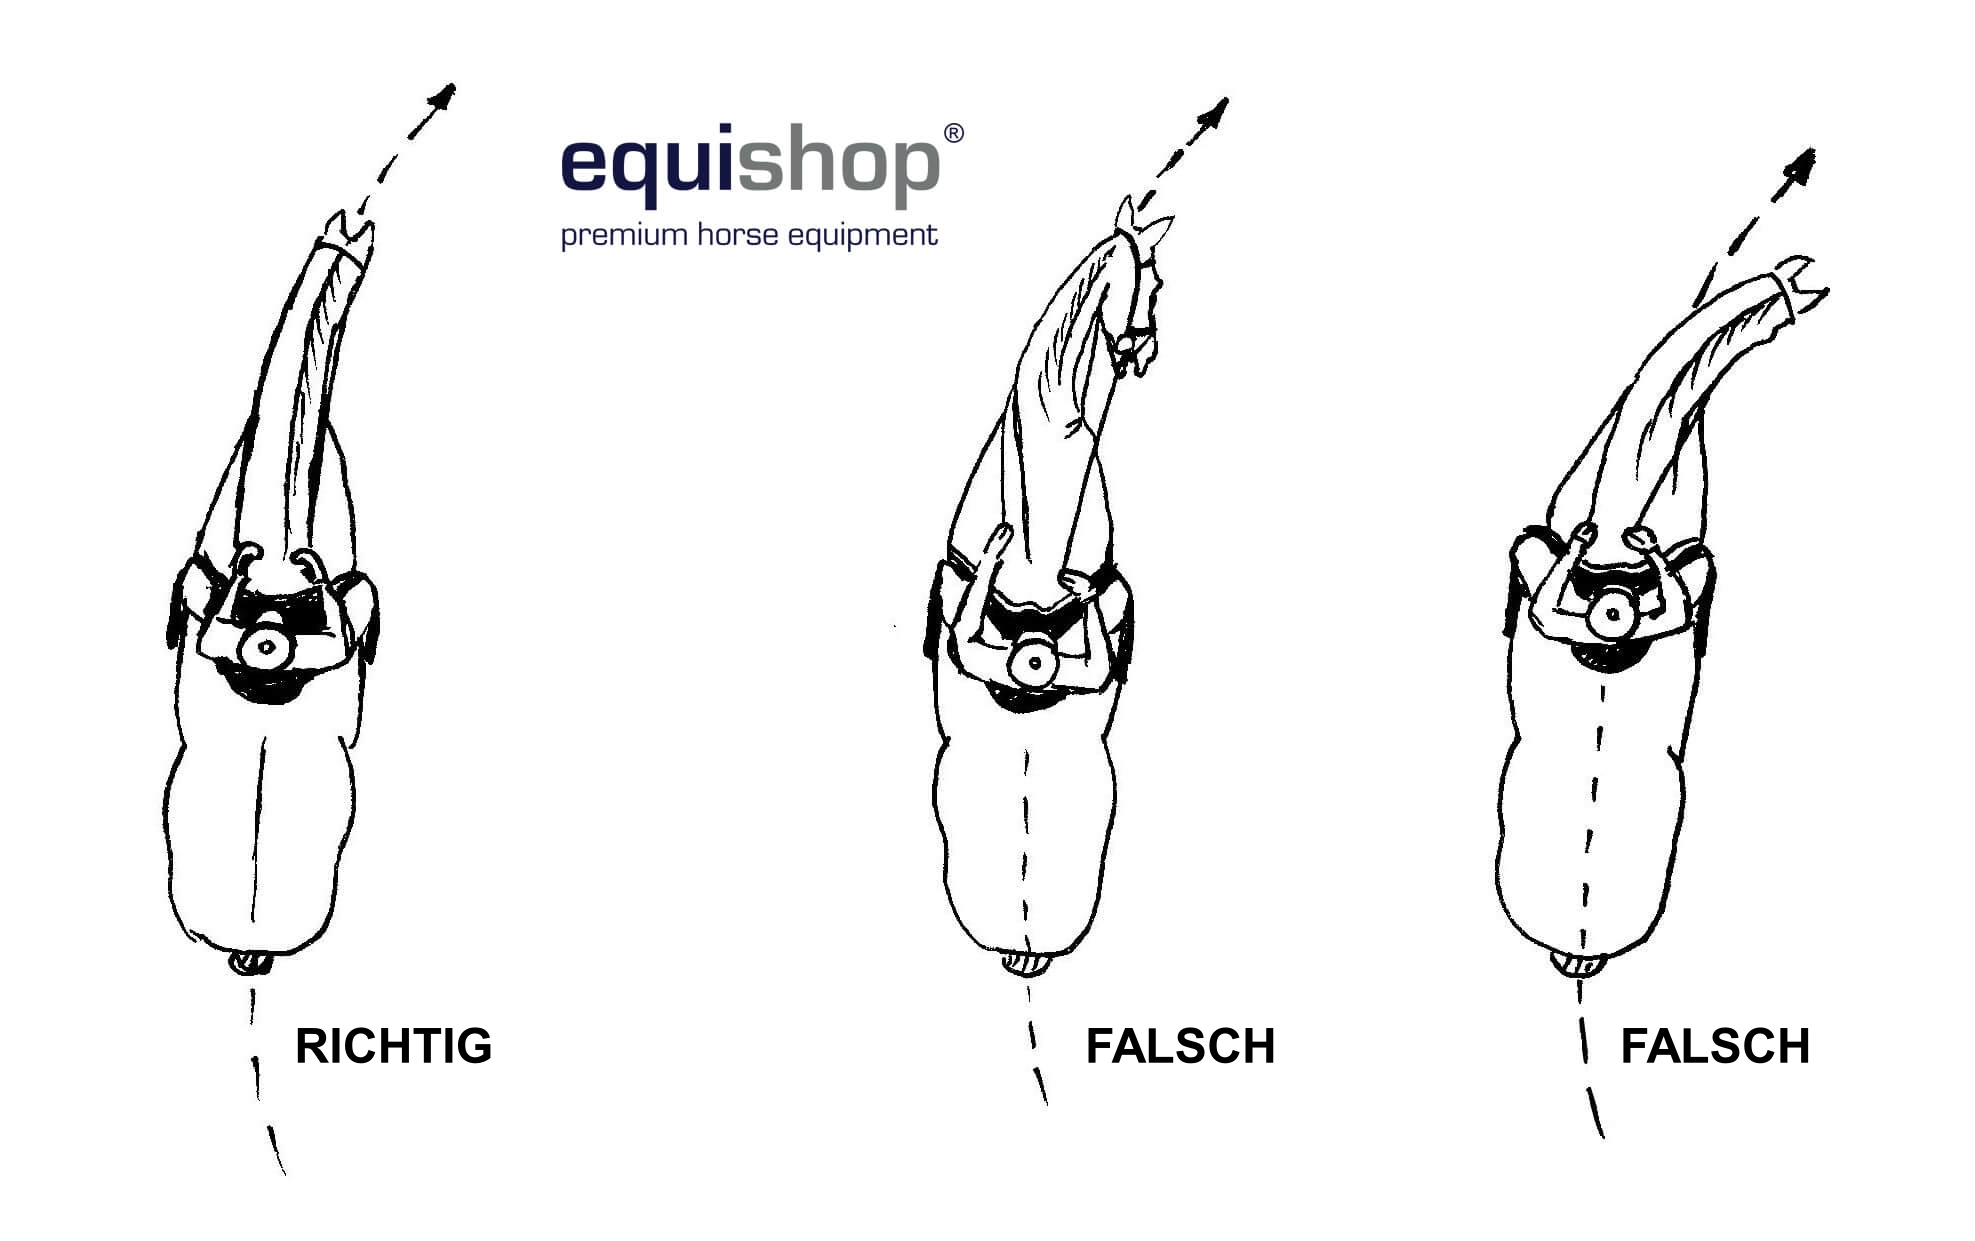
Die häufigsten Fehler bei der Positionierung in der Kurve
zu starke Positionierung, die dazu führt, dass das Pferd mit dem äußeren Schulterblatt aus dem Bogen fällt - die Folge davon ist ein unregelmäßiger Gang mit gestörtem Rhythmus,
erzwungene Aufstellung durch steife Reiterhand und zu stark gezogenen inneren Zügel (von links: drittes Beispiel im Bild unten) - verhindert das Heraustreten des Pferdes und das Stellen des inneren Hinter Gliedes,
zu starkes Vorstrecken der Hand und die Lösung der Außenzügel sowie Pferdekopfbiegung bei zu stark gezogener Innenzügel (von links: zweites Beispiel im Bild unten),
Krümmung am Genick - Blockierung der Position der äußeren Zügel (keine Verlängerung dieser Zügel),
keine Wadenaktion, der Reiter wirkt nur mit den Zügeln - das Pferd wird nur am Hals gebogen, wodurch es mit der Kruppe aus dem Bogen fällt,
Reiten auf der Acht - Richtungswechsel
In einer Situation, in der wir die Richtung ändern (z. B. bei der Acht), sollte man immer auf „eine Pferdelänge“ das Pferd aufrichten, so dass sein Körper vom Genick bis zum Schweif in einer geraden Linie steht. Wir sollten dann die Zügel ausrichten, unser Gewicht zentrieren und gleichmäßig agieren, wobei die Waden auf beiden Seiten des Pferdes parallel zueinander platziert sind. In der Anfangsausbildung reicht uns die Zeit von „einer Pferdelänge“ vielleicht nicht aus. In einer solchen Situation können wir es beispielsweise auf 3-4 Längen verlängern und nach einiger Zeit langsam auf eine Länge verkürzen.
Nach dem Aufrichten ändern wir die Hilfen und die Position und passen uns der Richtung des Bogens an. Dann verlagern wir unser Körpergewicht leicht auf die neue – innere Seite, verändern die Wadenposition und korrigieren die Zügellänge.
Es ist wichtig, immer zu versuchen, bei Richtungswechseln flexibel und fließend zu wirken. Um zu lernen, wie man Richtungswechsel durchführt, lohnt es sich, an der folgenden Einstellung zu üben, die wir bereits im Artikel zum Aufwärmen beschrieben haben.
Übung zum Trainieren sanfter Richtungswechsel – das Aufrichten des Pferdes erfolgt während des Ritts zwischen zwei Stangen.
Arbeit an den Bögen
Zwei Arten von Übungen werden für die Arbeit mit Bögen empfohlen: am Kreis und an der Acht.
Man sollte mit den Übungen auf dem Kreis beginnen, denn es ist viel weniger anstrengend als die Arbeit an einer Acht. Warum? Denn wir arbeiten nur einseitig mit dem Pferd und wechseln sie während der Übung nicht.
Bei Pferden mit kürzeren Schritten sollten wir über die Cavaletti entlang der inneren Linie des Kreises laufen, auf dem sie platziert sind. Mit der Zeit können wir ihren Schritt allmählich verlängern, indem wir uns der äußeren Linie nähern, wodurch der Kreisradius vergrößert wird (wie bei der Arbeit an der Longe).
Die Arbeit im Trab und Galopp erweist sich als am effektivsten – aber es lohnt sich, mehr Zeit in den Trab zu investieren. Die Arbeit im Schrittgang hat einen geringeren Trainingswert und kann sich anfangs als zu schwierig herausstellen – schnelleres Gehen erleichtert uns die richtige Positionierung des Pferdes am Bogen. Wir spüren es am meisten, wenn wir versuchen, durch die Mitte der Arena zu laufen - senkrecht von einer kurzen zur anderen kurzen Wand. Dann stellt sich heraus, dass das Schwierigste beim Gehen darin besteht, eine gerade Linie zu halten.
Deshalb beschreiben wir in unserem Artikel die Bogenarbeit mit Cavaletti nur in zwei Gangarten – Trab und Galopp.
Beispiele für Cavaletti Einstellungen
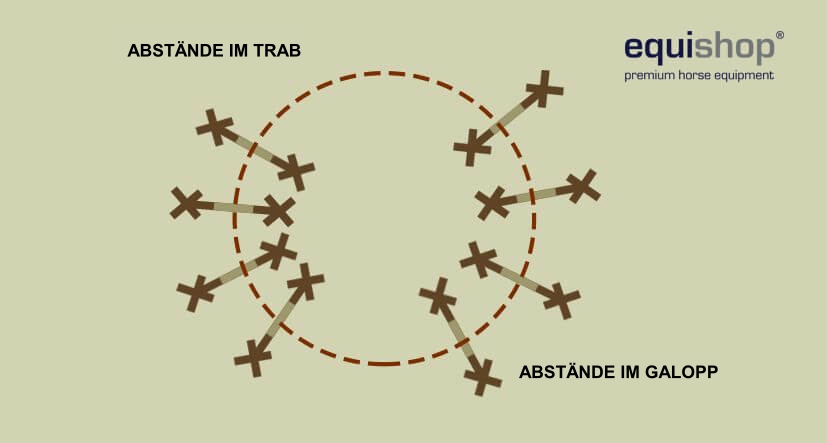
Am Kreis
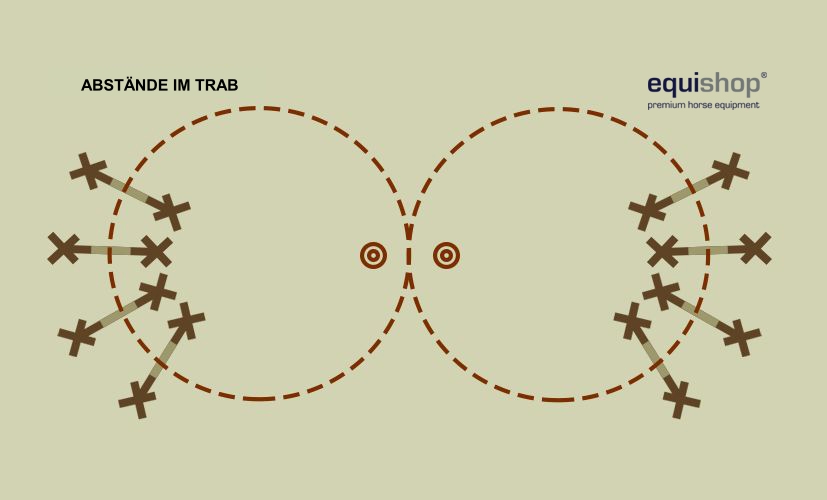
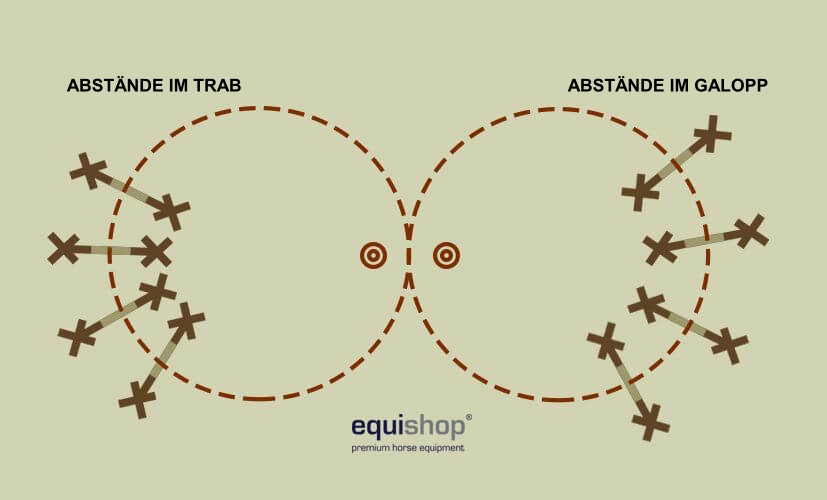
An der Acht
Achtung!
Dabei ist zu bedenken, dass die Arbeit auf Cavaletti am Bogen sehr hohe Anforderungen stellt und besonders das innere Hinterbein belastet. Wenn wir mit einem Pferd zu lange oder falsch trainieren, kann sich unser Pferd verletzen.
Beim Training sollten wir immer die Regel im Hinterkopf behalten „Ich wähle den Schwierigkeitsgrad der Übungen passend zum Ausbildungsstand meines Pferdes“. Jegliche Phasen des Pferdetrainings zu überspringen oder die Mängel seiner Fähigkeiten zu ignorieren – das wird sich niemals auszahlen. Diese Mängel kommen früher oder später immer zum Vorschein, und dann stellt sich heraus, dass wir ohnehin zu den Grundlagen zurückkehren müssen.
Richtiges Training auf Bögen mit Cavaletti
Theoretisch kann die Arbeit an Cavaletti an 2-3 Tagen pro Woche eingeplant werden (bei Training nicht weniger als 5-6 Mal pro Woche). Es lohnt sich immer, das Training in drei Phasen einzuteilen: Aufwärmen (20 Minuten), richtiges Arbeiten (15-20 Minuten) und Abschluss (15-20 Minuten).
Phase 1: Aufwärmen
Ziel dieser Phase ist nicht nur das Aufwärmen, sondern auch die Muskulatur unseres Pferdes zu entspannen, um die Beweglichkeit zu erhöhen und Verletzungen vorzubeugen.
Wir haben bereits in einem anderen Artikel darüber geschrieben, wie wichtig es ist und wie das Aufwärmen sowohl für das Pferd als auch für den Reiter sein sollte. Wenn wir in dieser Phase an Bögen arbeiten wollen, sollten wir auch das Aufwärmen an Stangenund Cavaletti berücksichtigen, insbesondere in gerader Linie - indem wir sie in allen drei Gangarten reiten (es lohnt sich, dies in den letzten paar Minuten dieser Phase zu tun).
Nach der Aufwärmphase (abgeschlossen mit der Arbeit an Stangen und Cavaletti) sollte man eine kurze Pause machen (immer noch mit kräftigem Schritt gehend), in der die Cavaletti für die Arbeit an Bögen - Kreisen und Achtern vorbereitet werden.
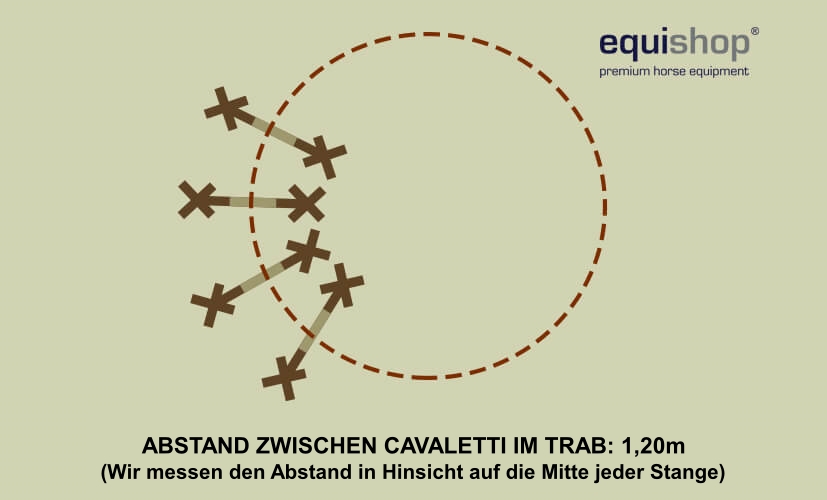
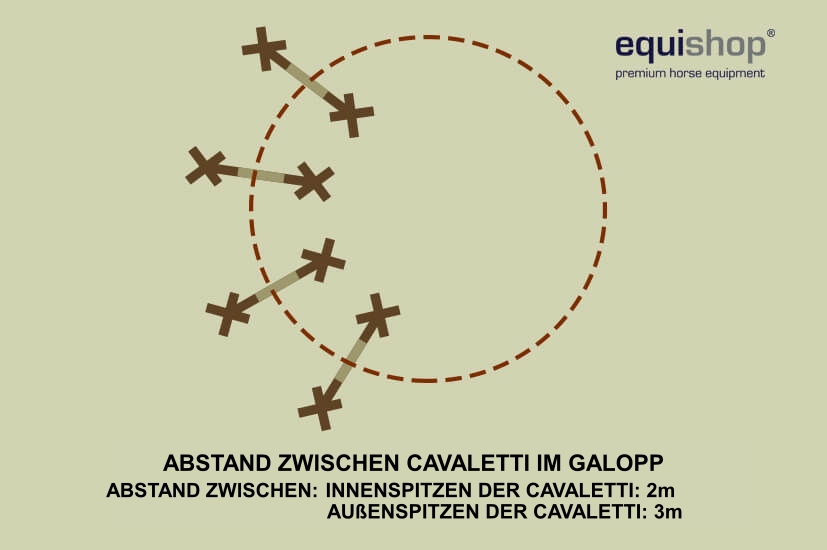
Wenn es um die Einstellung der Cavaletti geht – jeder Reiter wird es mit der Zeit passend für sein Pferd finden. Die obigen Einstellungsbeispiele sind nur Proportionen. Idealerweise ist der anfängliche "passende" Abstand für unsere Cavaletti, der zwischen den Mittelpunkten der Cavaletti gemessen wurde. Mit der Zeit sollten wir uns mehr bemühen, über die oben erwähnte äußere Linie hinauszugehen und so den Radius des Bogens zu vergrößern. Wozu? Auf der Außenseite sind die Abstände größer, wodurch das Pferd einen längeren Ausfallschritt machen muss, was seine Gliedmaßen stärker beansprucht und Muskeln entwickelt. Denken Sie jedoch daran, dass Kreise mit Cavalettiauf jeder Seite nur wenige Male vergrößert werden können.
Der Reiter überwindet die Cavaletti im Vollsitz - Ingrid Klimke im Bild, Quelle: paardenlifestyle.com
Phase 2: Eigentliche Arbeit an den Bögen
Arbeit im Trab
Während dieses Teils sollte man sich an die sehr einfachen aber passenden Worte von Gustav Steinbrecht erinnern: „Reite das Pferd vorwärts und strecke es“. Wir erinnern uns also daran, dass der Pferdekörper eine kohärente und glatte Linie des Bogens bilden sollte, auf dem er sich bewegt. Wir sollten auch versuchen, energisch zu reiten, aber das Pferd nicht hetzen lassen.
Beginnen wir mit der Arbeit im leichten Trab. Erst wenn das Pferd die Cavaletti im leichten Trab ohne Probleme ausführen kann, können wir in den Übungstrab gehen. Wir empfehlen, während des ersten Trainings keinen Vollsitz einzuführen.
Wenn wir an unserer Körperhaltung arbeiten wollen, können wir natürlich auch versuchen, Hindernisse im Halbsitz zu überwinden, müssen dann aber damit rechnen, dass wir die Position des Pferdes insgesamt schwerer kontrollieren können. Daher lohnt es sich auch, den Halbsitz auf die nächsten Trainings zu verlegen, wenn unser Pferd die Läufe auf den Bögen bereits gemeistert hat.
Denken Sie daran, mit der Arbeit am Kreis zu beginnen und die "einfachere" Seite zu reiten, d.h. die Seite, auf der das Pferd flexibler und leichter zu drehen ist. Nach einiger Zeit ändern wir die Richtung auf die "schwierigere" Seite (steifere), aber es sollte kürzer dauern als auf der "leichteren" Seite. Die Erfahrung zeigt, dass ein Richtungswechsel von Zeit zu Zeit (anstatt hauptsächlich auf der „schwierigere Seite“ zu reiten) der steifen Seite gut tut, schon deshalb, weil das Pferd das Problem vielleicht für eine Weile vergisst und wieder arbeitswillig wird.
Nach mehrmaligem Wiederholen auf dem Bogen lohnt es sich, einen kurzen Ausflug entlang der Wände des Reitplatzes zu unternehmen, um die "Frische" und Energie der Pferdebewegungen wiederherzustellen und so keine Monotonie während des Trainings zuzulassen. Gerade bei sehr steif werdenden Pferden sind solche „Pausen“ von den Cavaletti unbedingt zu empfehlen.
Wenn wir uns bereits stark fühlen, können wir nach der Arbeit am Kreis zur Arbeit an der Acht übergehen, wo wir die Position des Pferdekörpers zusammen mit einer Richtungsänderung ändern werden.
Vielleicht ist es ziemlich klar, aber: Wir arbeiten immer zuerst im Trab und dann im Galopp (wenn wir das Gefühl haben, dass das Pferd dafür bereit ist).
Nach Trabübungen empfiehlt es sich, vor dem Galopplauf eine kurze Pause einzulegen.
Cavaletti im Galopp, Quelle: pferdiathek.tv
Arbeit im Galopp
Das Galoppieren auf einem Bogen trainiert das Pferd und verbessert seine Biegung in dieser Gangart. Man sollte jedoch beachten, dass das Tier versucht, sein Bein im Galopp zu wechseln, wenn es über die Cavaletti springt - um dies zu verhindern, müssen wir die ganze Zeit die richtige Position und Biegung seines Körpers beibehalten.
Wir können damit beginnen, eine Cavaletti auf der niedrigsten Höhe zu platzieren und dann mehr, bis 4 insgesamt, hinzuzufügen. Diese Übung erfordert, dass wir unsere Strecke ständig und angemessen planen und auf die nächste Cavaletti schauen, während wir die vorherige überwinden. Außerdem zwingt es uns immer, die Kreiszeichnung im Auge zu behalten - die Annäherung an die Mitte der Cavaletti. Nach ein paar guten Läufen der vier Cavaletti können wir sie anheben.
Beim Galopp kann man auch verschiedene Kombinationen von Cavaletti Positionen ausprobieren. Versuchen Sie jedoch immer, Ihr Pferd während des Trainings nicht weglaufen und beschleunigen zu lassen.
Diese Übung kann mit einem fliegendem Beinwechsel im Galopp oder einem Übergang in den Trab beim Richtungswechsel ausgeführt werden.
Cavaletti in der Mitte der Acht.
Die Cavaletti wurde in der Mitte der Acht so aufgestellt, dass sie an der Stelle des Richtungswechsels überwunden werden kann. Diese Übung eignet sich gut zum Erlernen des Beinwechsels im Galopp.
Vier Cavaletti - innere Linie - Cavaletti mit 3 Foules Abstand, äußere Linie - 4 Foules.
Ein weiterer Vorschlag ist, vier Stangen in gleichen Abständen auf dem Kreisumfang zu platzieren. Bei dieser Übung sollte man jemanden am Boden haben, der die Cavaletti schnell korrigieren kann, wenn zum Beispiel die Distanzen nicht „passen“ oder wenn die Cavaletti bei einem Sprung getroffen wird. Diese Übung verbessert die Planbarkeit der nächsten Züge, weil die Cavaletti sehr schnell hintereinander gesprungen werden. Größere Abstände zwischen den Cavaletti (3-4 Foules) können dazu führen, dass das Pferd das Kreismuster und den Rhythmus durch Beschleunigung verliert. Der Reiter muss daher darauf achten, dass sich das Tier in einem gleichmäßigen Tempo bewegt, indem er halbe Paraden verwendet. Einen gleichmäßigen Galopp beizubehalten ist leider nicht einfach. Nach ein paar Runden lohnt es sich, eine Pause einzulegen.
Beginnen Sie bei der obigen Übung mit Anritten auf die Mitte der Cavaletti. Der Reiter sollte zu Beginn weder auf die Anzahl der Foules zwischen den Cavaletti noch auf die richtige Stelle zum Abspringen achten – das wird sich mit der Zeit ergeben. Nach ein paar Runden sollte das Pferd den Rhythmus von selbst aufnehmen. In der nächsten Stufe kann der Reiter versuchen, sich entlang der Innen- oder Außenlinie zu bewegen - wobei er das Pferd bei 3 oder 4 Galopp-Foules bewusst zwischen den Cavaletti führt.
Diese Übung lehrt das Pferd, flexibel in einer Kurve zu galoppieren, und den Reiter, den Rhythmus und die Distanz zu spüren.
Arbeit mit Gangwechsel
Wenn wir uns sowohl den Kreis als auch die Acht beherrschen, können wir eine andere Variante einführen - Kreise und Acht mit Änderung der Gangart (Bild unten).
Wichtig ist, dass die eigentliche Arbeitsphasenie zu lange dauert. Wenn wir bei unserem Pferd Ermüdung feststellen, sollten die Übungen sofort abgebrochen und mit der nächsten Phase fortgefahren werden - nämlich dem Abschluss.
Phase 3: Abschluss
Ein verlängerte Zügel bei Cavaletti lässt das Pferd den Kopf senken, was so die Rückenmuskulatur betont und entspannt, Quelle: horsemagazine.com
Diese Phase dient dazu, unser Training schrittweise zu beenden. In diesem Teil sollte unsere Annahme sein, das Pferd auf die Rückkehr in den Stall vorzubereiten – es zu beruhigen und zu entspannen. Das Pferd soll ruhig und zufrieden zur Box zurückkehren, um im nächsten Training noch bereitwilliger zu arbeiten. Deshalb sollte man im ersten Teil dieser Phase 2-3 einfache Übungen machen, von denen wir sicher sind, dass unser Pferd sie richtig ausführt. Ein guter Trainingsabschluss ist die halbe Miete!
Nach der Arbeit an den Bögen können wir die Cavaletti noch einige Male in einer geraden Linie reiten (innerhalb der oben genannten 2-3 Übungen), die Zügel für das Pferd allmählich verlängern und mit dem „von der Hand kauen“ abschließen.
Anschließend sollte das Pferd je nach Intensität des Trainings 10-15 Minuten am langer Zügel geführt werden.
Wir hoffen, dass sich unsere Tipps als nützlich erweisen und Sie sich dank ihnen entscheiden werden, Ihr tägliches Training zu diversifizieren, indem Sie Übungen an Bögen mit Cavaletti einführen :)
 Das Produkt wurde erfolgreich zu Ihrem Warenkorb hinzugfügt


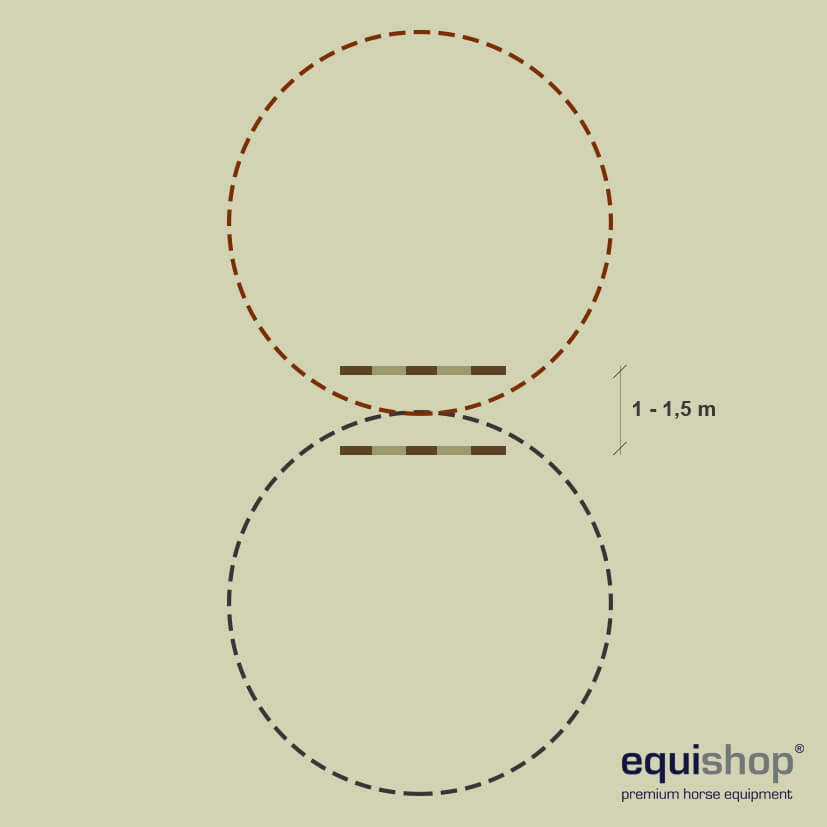 Übung zum Trainieren sanfter Richtungswechsel – das Aufrichten des Pferdes erfolgt während des Ritts zwischen zwei Stangen.
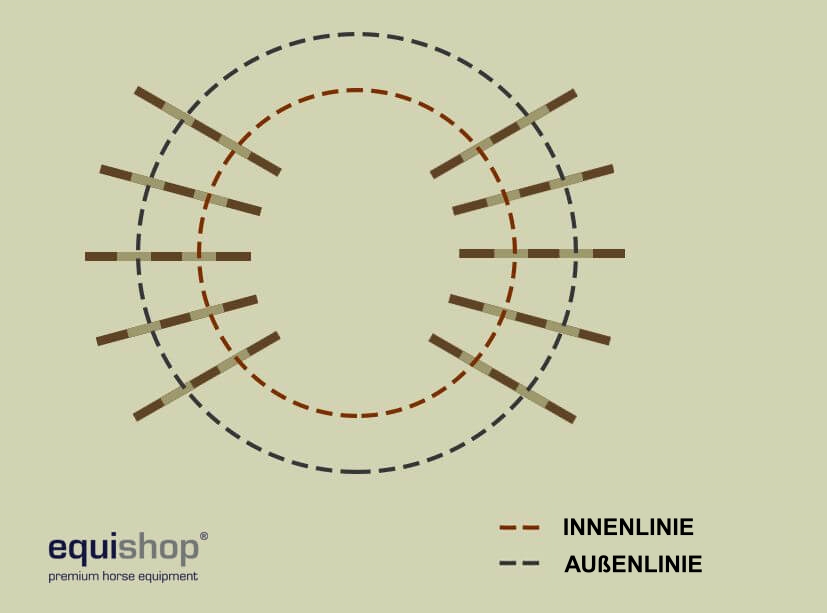
 Der Reiter überwindet die Cavaletti im Vollsitz - Ingrid Klimke im Bild, Quelle: paardenlifestyle.com
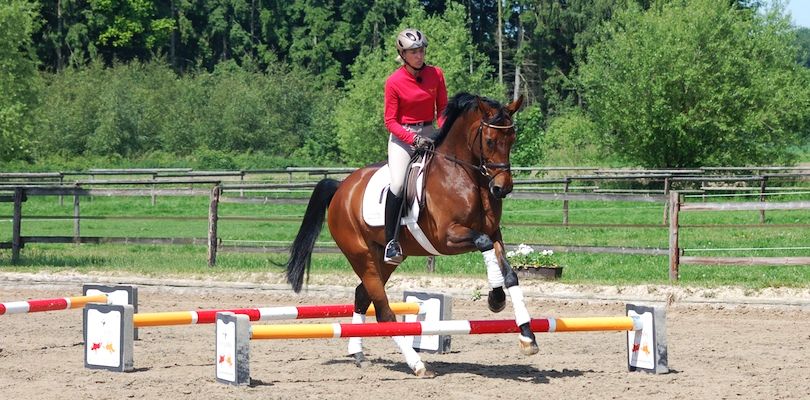 Cavaletti im Galopp, Quelle: pferdiathek.tv
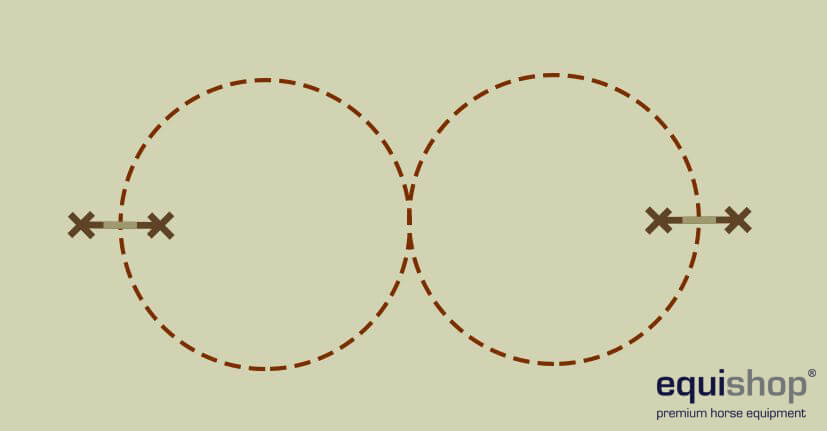 Diese Übung kann mit einem fliegendem Beinwechsel im Galopp oder einem Übergang in den Trab beim Richtungswechsel ausgeführt werden.
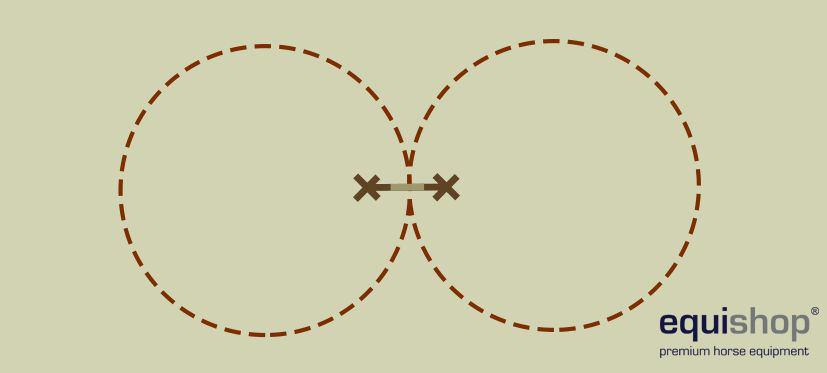 Cavaletti in der Mitte der Acht.
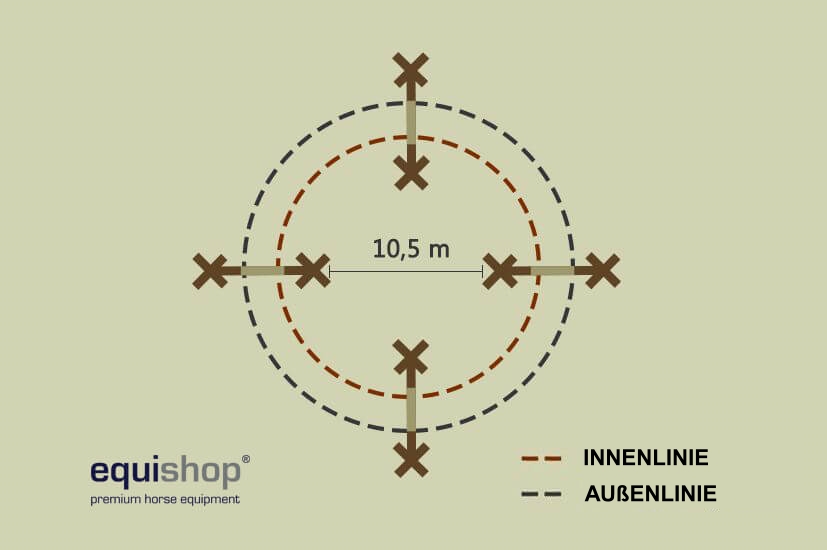
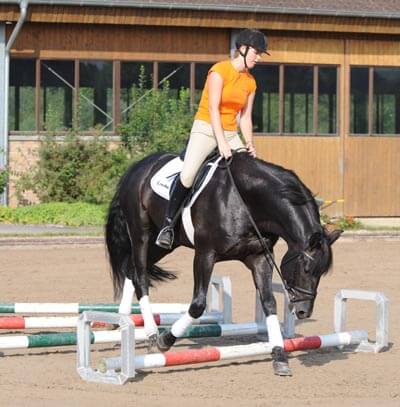 Ein verlängerte Zügel bei Cavaletti lässt das Pferd den Kopf senken, was so die Rückenmuskulatur betont und entspannt, Quelle: horsemagazine.com

